The first time I watched an old timber table come back to life, it was in a draughty weatherboard cottage on the edge of a gum-lined creek in regional Victoria. The table was nothing special at first glance—scarred, dull, ringed with the ghosts of a thousand tea cups. Sunlight from the kitchen window lit up every scratch. Yet beneath that tired, dry surface lay a story of family dinners, birthday cakes, homework spread out under late-night lamplight. It seemed almost cruel that time had smothered all that history under a film of neglect.
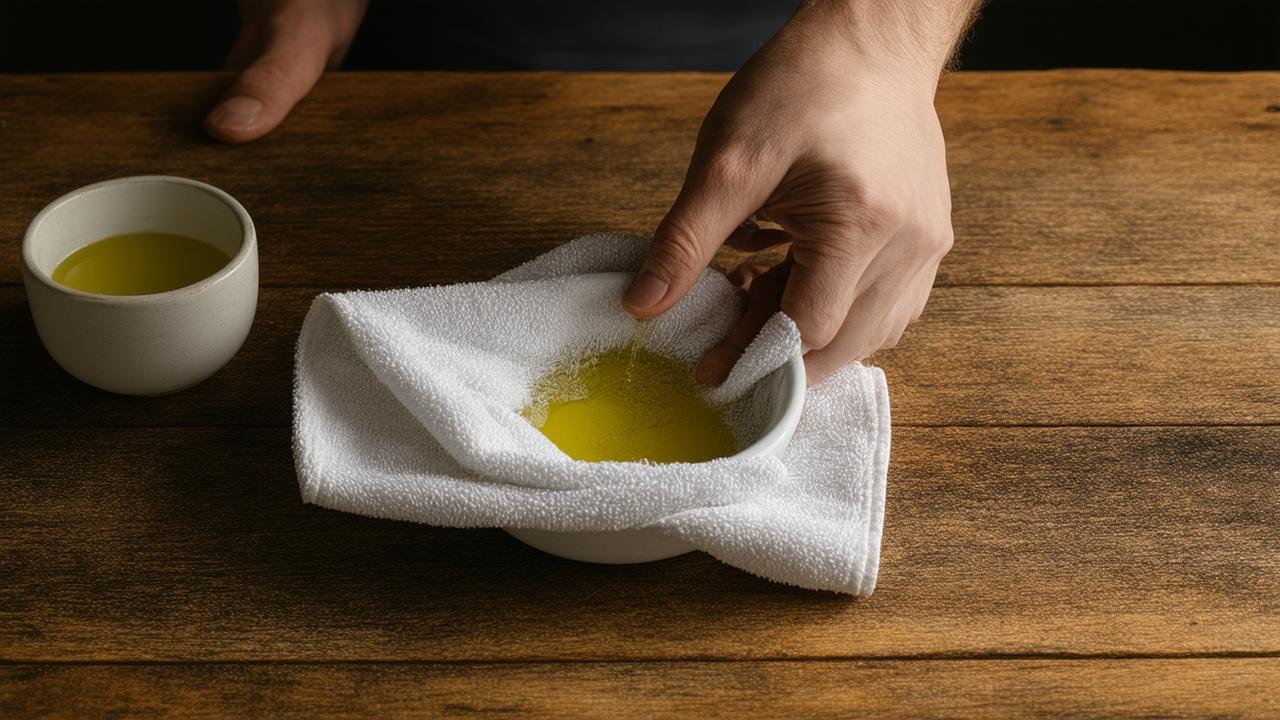
Standing over it that autumn afternoon was a local restoration expert, sleeves rolled, a small bowl in one hand and what looked like an ordinary microfiber cloth in the other. No harsh-smelling chemicals. No sanders roaring to life. Just a faint citrus scent and the quiet confidence of someone who knows exactly what tired timber needs. “Most Aussies think you need to strip and re-varnish,” he said, swirling the cloth in the solution. “Truth is, this”—he lifted the dripping, amber-tinted cloth—“is often all it takes to bring it back to almost brand-new.”
The “Secret” Solution Hiding in Your Kitchen
That simple bowl of liquid could have come from almost any Australian kitchen. No exotic oils, no mysterious imported blends, no plastic bottle from the hardware aisle. At its heart, the solution was a gentle mix of:
- A neutral oil (like pure olive oil, or better yet, a lighter food-safe oil such as grapeseed or rice bran)
- White vinegar
- A few drops of real citrus—often lemon, orange, or even eucalyptus for that distinct Australian scent
Different restoration experts tweak the ratios and ingredients, but the principle stays the same: a simple, food-safe combination that cuts through grime, nourishes dry timber, and brings out the grain without suffocating the wood under thick, shiny coatings.
In that creaky old kitchen, the expert dipped a soft microfiber cloth into the mixture, wrung it until it was damp but not dripping, then glided it slowly over the table. The change was almost immediate. Dust streaks disappeared. The cloudy, chalky look melted away. The timber underneath woke up, its rich brown hues glowing like it had been waiting years for a drink.
“People are always shocked,” he said, moving in careful circles. “They think they need to send pieces off for expensive restoration, but a good clean and feed is often enough. It’s like giving your furniture a long glass of water after a drought.”
The Microfiber Advantage: Why the Cloth Matters
It’s tempting to think the magic lies entirely in the liquid, but every restorer I’ve spoken to across New South Wales, Victoria, and Queensland insists on one non-negotiable: use a quality microfiber cloth. Not an old T-shirt. Not a kitchen sponge. Microfiber.
There’s a reason. Microfiber threads are incredibly fine—much finer than cotton—so they can trap dust and tiny particles instead of pushing them around. When you combine that with a wood-safe solution, you’re not just smearing yesterday’s surface grime into the grain; you’re lifting it out and revealing what’s underneath.
Run your fingers over aged timber before you start, and you’ll feel the subtle roughness—dust embedded in grooves, a faint stickiness from cooking oils or handprints. After a pass with a damp microfiber cloth and that gentle homemade mix, the same surface suddenly feels smoother, cleaner, younger.
“Microfiber does the delicate heavy lifting,” one Brisbane-based furniture restorer told me. “It lets the solution work properly instead of fighting against old dirt.”
How to Mix the Solution at Home (The Aussie-Friendly Way)
While every expert swears by their own favourite ratios, there’s a simple, trusted formula that works beautifully for most sealed or previously finished wooden furniture in Australian homes:
| Ingredient | Amount | Purpose |
|---|---|---|
| Light vegetable oil (e.g. grapeseed or rice bran) | 3 parts | Feeds and enriches the timber, enhances grain |
| White vinegar | 1 part | Gently cuts through grease and cloudy buildup |
| Fresh citrus juice or a few drops of essential oil (lemon, orange, eucalyptus) | Optional – a squeeze or 3–5 drops | Adds a fresh scent and a little extra cleaning power |
Pour the oil and vinegar into a small bowl or jar and whisk or shake until they blend into a cloudy liquid. Add your citrus last, then give it one more stir. The mixture will try to separate over time, so keep a spoon handy if you’re doing a larger piece.
And this is important: always test on a small, hidden patch first. The underside of a table, the back of a chair leg, or inside an unseen panel. Apply a little with your microfiber cloth, wait for it to dry, and check the finish. If it looks richer but not sticky or glossy, you’re in safe territory.
Step-by-Step: Bringing Tired Timber Back to Life
Picture a sun-faded coffee table in a Sydney unit, or a scratched-up jarrah sideboard in a Perth federation home. Under harsh daylight, every flaw is exaggerated. Yet with an hour to spare and a bowl of this solution, the transformation can be quietly dramatic.
- Dust first, gently. Use a dry microfiber cloth to lift loose dust, crumbs, and cobwebs. You don’t want sand or grit dragged over the surface.
- Prepare your cloth. Dip a fresh microfiber cloth into the solution, then wring it out until it’s just damp. It should not be dripping; too much liquid can overwhelm older finishes.
- Work with the grain. Glide the cloth along the direction of the wood grain, not across it. Use slow, even strokes, and don’t rush. You’ll start seeing dull areas turn richer and more defined.
- Tackle stubborn spots. For old water marks or sticky patches, apply a little extra solution and use small circular motions with light pressure. Think “polishing with patience” rather than scrubbing.
- Buff with a dry cloth. After covering a section, switch to a clean, dry microfiber cloth and buff the area. This removes excess oil and leaves a soft, velvety sheen rather than a greasy film.
- Let it rest. Give the piece a few hours to settle. The timber absorbs what it needs; the rest evaporates or stays on the surface for that final buff.
By late afternoon in that Victorian cottage, the once-tired kitchen table had changed character entirely. The surface glowed warmly in the slanting light, each knot and swirl of grain visible again, but not in a showy, high-gloss way. It simply looked… cared for. As if someone had finally paid attention.
Why Australian Furniture Responds So Well to This Approach
Australia’s climate can be brutal on timber. From salt-laden coastal air to bone-dry inland summers and humidity-soaked northern wet seasons, wood in Australian homes is constantly expanding, contracting, and thirsty. Our homes are full of mixed timber stories: a Tasmanian oak bookcase here, a jarrah dining table there, a pine chest inherited from someone’s grandparents who once crossed the Nullarbor.
Many of these pieces sit in living rooms where air conditioners, heaters, and streaming sunlight take turns drying them out. Over time, the original finish can lose its luster, not because the wood is ruined, but because the surface layers have been dulled by dust, micro-scratches, and everyday life.
Restoration experts across the country note that Australian timbers, both local and imported, respond particularly well to gentle “feeding” with light oils. Heavy commercial polishes often leave waxy build-up that traps dust and can turn cloudy in humid weather. By contrast, this simple oil-and-vinegar mix mimics what many traditional furniture polishes used to do, but more gently and with ingredients you actually recognise.
It’s not about encasing the wood in plastic shine; it’s about allowing the timber to breathe while still looking its best—a balance that suits our relaxed, lived-in Australian style. A dining table that bears the faintest memory of a scratch or two feels more honest than one that looks like it’s never hosted a family meal.
Knowing When Simple Care Is Enough (and When It’s Not)
Of course, not every piece can be rescued by a microfiber cloth and a bowl of kitchen ingredients. If the finish is flaking, the wood is greyed from weather exposure, or there are deep gouges, you may be looking at sanding and refinishing—or handing it over to a professional restorer.
But there’s a broad middle ground where most everyday furniture lives: dull, a bit grey, maybe a few faint rings from cold drinks, but structurally sound. That’s where this method shines. It respects the original finish instead of erasing it.
➡️ Psychology explains that people who prefer being alone are often recharging their energy, not withdrawing from others
➡️ Say goodbye to gray hair with this 2?ingredient homemade dye
➡️ Scientists discover the body’s natural “off switch” for inflammation, opening new paths for treatment
➡️ Psychology teams identify three recurring color preferences linked with fragile self-confidence
➡️ Tenant fails to return keys at end of lease, court rules landlord cannot charge extra rent
➡️ Sheets shouldn’t be changed monthly or every two weeks: an expert gives the exact frequency
➡️ Social Security 2026 new monthly payment figures, payment boost for confirmed : new monthly amounts for retirees, spouses, survivors, and disabled beneficiaries explained
One Melbourne restorer put it this way: “Think of it like skincare for timber. You don’t need a facelift; you just need to cleanse and moisturise properly.” That gentle reset is often all an old side table, bookshelf, or bedhead needs to look surprisingly close to new—without losing the patina that gives it charm.
And there’s something deeply satisfying about doing it yourself. On a quiet Sunday, windows open, magpies warbling outside, you move steadily from piece to piece: the bedside table from your share house days, the hall console you found on Gumtree, the cedar chest that’s always smelled faintly of old linen and lavender. Each one, wiped and fed, starts to glimmer again, as if pleased to be noticed.
Bringing It Home: A Slower, Kinder Way to Live with Your Furniture
In an age where flat-pack furniture can arrive at your door within days and leave just as quickly for the kerbside during council cleanup, there’s an almost subversive pleasure in choosing to stay with the pieces you already own. To notice, instead of replace. To restore, instead of discard.
A microfiber cloth soaked in that simple homemade solution is more than a cleaning trick; it’s a small ritual of attention. It invites you to run your hands along surfaces you usually ignore, to look closely at the details—the dovetail joints, the soft rounding on a tabletop edge where countless elbows have rested, the dimples where someone once tapped a pen, thinking.
Australian homes, whether they’re inner-city terraces or breezy Queenslanders raised on stumps, hold stories in their timber. When you take the time to care for that wood, you’re also caring for the memories that have soaked into it over years of everyday living.
Next time you walk past that tired-looking cabinet or the old wooden chair you keep meaning to replace, pause. Imagine what might be hiding under the haze: richer colour, clearer grain, a quiet resilience that has survived heatwaves and cold snaps, kids, pets, moves, and parties.
All it might need is a bowl of oil and vinegar, a squeeze of citrus, and a humble microfiber cloth, guided by your hands for half an hour. Often, that’s enough to turn “past its prime” into “I can’t believe this is the same piece.” Not factory-new, perhaps—but something better: almost brand-new, with all its history still intact.
Frequently Asked Questions
Is this homemade solution safe for all types of wood?
It’s generally safe for sealed or previously finished indoor wooden furniture, but always test on a hidden area first. Avoid using it on raw, unfinished timber or wax-only finishes without professional advice.
How often should I use this method on my furniture?
For most Australian homes, every 3–6 months is enough. In very dry or air-conditioned environments, you might repeat it slightly more often on frequently used pieces like dining tables.
Will the vinegar damage the finish?
In the small, diluted amount used here and applied with a damp (not wet) cloth, white vinegar is usually safe and helpful for cutting through grime. The key is not to soak the surface and always buff dry afterwards.
Can I use olive oil instead of lighter oils?
You can, but lighter oils such as grapeseed or rice bran are usually preferred because they’re less likely to become sticky over time. If you only have olive oil, use it sparingly and buff thoroughly.
What if my furniture still looks dull after cleaning?
If one careful application doesn’t revive the sheen, try a second round after a day. If it still looks flat, the original finish may be too worn or damaged, and professional refinishing or a more involved restoration might be needed.