The drawer sticks halfway before it finally gives, jolting a small avalanche of rubber and plastic into motion. A tumbleweed of black cables rolls forward, tangling itself confidently around an old phone charger and something that might once have been a set of earphones. You pause, fingers poised above the mess, and think: How did it get this bad… again?
The Quiet Chaos Living in Your Drawers
Everyone has a cable graveyard. Maybe it’s a drawer in the kitchen, a shoebox in the wardrobe, or a plastic tub quietly swelling in the spare room. It holds the ghosts of gadgets past: camera chargers for cameras you don’t own, USB cables in three generations of connectors, HDMI cords that may or may not still work, and a mysterious grey cable that’s followed you through four house moves.
You tell yourself you’re being responsible—It might come in handy one day. But there’s a particular kind of irritation that flares when you’re about to jump on a Zoom call, your laptop battery is on 4%, and the cable you actually need is knotted into something that looks like it belongs in a fishing net off the coast of Fremantle.
In homes across Australia, from inner-city apartments in Melbourne to breezy Queenslanders in Townsville, the story is the same: cables shoved, wrapped too tight, bent at odd angles, or piled in bags and baskets. They’re out of sight, sure—but they’re also out of reach when you need them. And whether we realise it or not, we’re shortening their lifespan every time we store them the way that feels quickest in the moment.
The Problem Isn’t the Cables – It’s Our Habits
Cables are deceptively simple. A bit of plastic, some wire, a connector on each end. But inside each one is a tiny, precise system of copper strands and shielding, designed to flex gently—not to be strangled into tight coils or crushed into crowded drawers.
Most of us make the same mistakes:
- Wrapping cables tightly around power bricks, creating stress points near the ends
- Using twist ties, rubber bands, or hair ties that bite into the insulation
- Throwing all cables into a single drawer or box “for later”
- Folding them in half repeatedly, weakening the internal wiring
Over time, those habits cause fraying, loose connections, and cables that only charge if you hold them at just the right angle—the cable equivalent of balancing your TV antenna with a coat hanger during a summer storm.
The real issue isn’t just damage, though. It’s accessibility. A cable that’s alive but lost in a tangle is functionally the same as a broken one. When you can’t find the right cord in under 10 seconds, your system has failed you—even if everything is technically “stored.”
A Different Way to Think About Cables
Imagine walking over to a single box, drawer, or shelf and knowing—without rummaging—that you’ll grab the right cable in one smooth movement. No tangles, no surprises, no mystery cords from 2009. Just what you need, ready to go.
The method that makes this possible isn’t complicated, high-tech, or expensive. It’s a small mindset shift: treat cables like everyday tools, not junk you’ll “deal with later.” In the same way a gardener hangs their tools in easy reach of the back door, you can give your cables a place that respects how often you actually use them.
Electricians use a technique called the over–under coil to store long cables without tangles or kinks. Musicians use it for instrument leads and microphone cables. Photographers use it for power cords and lighting cables. It keeps things neat, prevents stress on the wire, and lets the cable fall flat and obediently when it’s unrolled. There’s no reason it shouldn’t live in Australian homes as easily as it does on job sites and stages.
Pair that coil technique with a simple, visual way of storing your cables, and suddenly they’re not just “put away”—they’re available.
The Over–Under Coil: The Secret the Pros Swear By
Here’s how to coil a cable the way the pros do, whether it’s your laptop charger, extension cord, or that long USB-C cable your teenager keeps stealing:
- Hold the cable loosely in your non-dominant hand near one end. Don’t start right at the plug—give it a few centimetres of slack.
- First loop (over): With your dominant hand, grab the cable about 30–50 cm along and bring it toward your body, letting it naturally fall into a loop. Place this loop into your holding hand.
- Second loop (under): Grab the next section, but this time, twist your wrist slightly so the cable rolls in the opposite direction as you bring it back. It’ll feel a bit odd at first—like you’re flipping the cable as you go. Lay that loop onto the others.
- Repeat over–under all the way to the other end of the cable: over, under, over, under.
- Secure gently with a soft Velcro tie or a reusable fabric cable strap. Avoid tight rubber bands or anything that pinches.
The magic of this method is that it respects the natural twist of the cable instead of fighting it. When you drop an over–under coiled cable onto the floor and give one light pull, it unravels smoothly, instead of doing that infuriating springy snake dance that knots around chair legs and bag straps.
And no, it’s not just for tradies or sound engineers. Once you’ve used it a few times, it becomes muscle memory—and you start realising how awkward your old wrapping habits were.
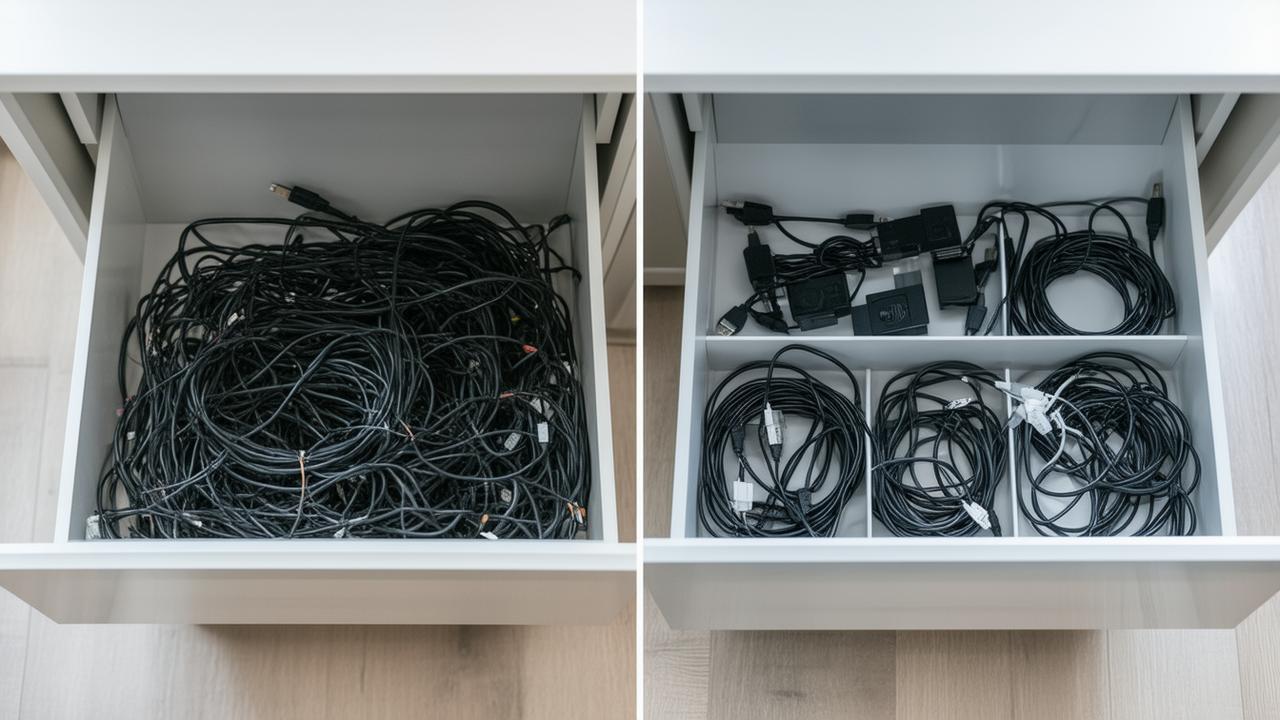
Making Your Cables Instantly Findable
Coiling is only half the story. The other half is where those neatly coiled cables live. The key is to keep them:
- Visible at a glance
- Grouped by purpose, not by panic
- Close to where you actually use them
Here’s a simple, Aussie-home-friendly approach that works whether you’re in a share house in Brisbane or a family place in Wollongong.
1. One central “tech kit” for the house
Pick a small crate, box, or fabric cube—something that fits easily on a shelf or in a cupboard near where devices usually get charged. This is your main cable home base. Inside, divide by use:
- Daily use cables (phone chargers, USB-C, Lightning, micro-USB if you still have older gear)
- Entertainment cables (HDMI, optical audio, spare TV power leads)
- Computer & work cables (laptop chargers, ethernet cables, USB hubs)
Use small cardboard boxes, reusable sandwich containers, or zip pouches to group them. Nothing fancy—just separated enough that you can see what’s what.
2. Room-based “mini kits”
For spaces where you constantly steal cables from another room—like the living room or home office—set up a tiny version of that system. A small basket beside the couch for TV, gaming, and streaming cables; a slim drawer organiser in the study for laptop and printer cables. Coiled, grouped, reachable.
3. Label just enough
Australians are pretty good at the “she’ll be right” approach, but cables are where that attitude comes back to bite. A tiny label or text with a permanent marker can save a lot of future swearing.
Label only what looks similar:
- “Monitor – Dell”
- “NBN modem power”
- “Soundbar HDMI (ARC)”
You don’t need to name every cable like a pet—just the ones that could cause a guessing game later.
➡️ The streak-free window-cleaning method that still works flawlessly even in freezing temperatures
➡️ The quick and effective method to restore your TV screen to like-new condition
➡️ Thousands of passengers stranded in USA as Delta, American, JetBlue, Spirit and others cancel 470 and delay 4,946 flights, disrupting Atlanta, Chicago, New York, Los Angeles, Dallas, Miami, Orlando, Boston, Detroit, Fort Lauderdale and more
➡️ The sleep pattern that predicts alzheimer’s risk 15 years before symptoms
➡️ These zodiac signs are destined for major prosperity in 2026, according to astrological forecasts
➡️ The RSPCA urges anyone with robins in their garden to put out this simple kitchen staple to help birds cope right now
➡️ The RSPCA urges anyone with robins in their garden to put out this simple kitchen staple today
| Cable Type | Best Storage Spot | How Often You’ll Use It |
|---|---|---|
| Phone charging cables | Bedside table / living room basket | Daily |
| Laptop chargers | Desk drawer or work bag | Daily / weekly |
| HDMI & TV cables | TV unit drawer / entertainment basket | Weekly / occasionally |
| Old camera & gadget cables | Labeled “archive” box in cupboard | Rarely |
| Extension leads & power boards | Laundry / garage wall hooks | Occasionally |
Decluttering: The Part No One Wants to Do (But You’ll Thank Yourself For)
Some cables simply don’t deserve to stay. That drawer of mystery cords isn’t just annoying; it’s quietly draining your attention every time you open it. The good news is you don’t have to sort it like an IT professional—just a little ruthless honesty goes a long way.
Spread every cable out on the table or floor. Yes, all of them. It’ll look like a tech snake pit. Then ask three questions for each one:
- Do I still own the device this belongs to? If not, it’s a candidate for e-waste recycling.
- Do I have another cable that does the same job? If you’ve got six micro-USB cables and two devices that use them, you don’t need all six.
- Would I notice if this cable disappeared forever? If the answer’s no, let it go.
Set aside anything obviously broken—frayed insulation, bent connectors, exposed wire. These aren’t “maybe useful”—they’re hazards. Most councils around Australia have e-waste collection points or periodic drop-off days. Pile them up and give them a one-way trip out of your home and into proper recycling.
What’s left should be the cables that actually deserve your over–under coil and your curated storage space. Fewer cables, better cared for, and instantly findable.
Living With Cables That Work With You, Not Against You
Once you’ve done this once—coiled properly, sorted sensibly, stored visibly—your everyday tech life shifts in small, satisfying ways.
Your teenager yells from the other room, “Mum, where’s the HDMI cable?” and instead of a 10-minute excavation behind the TV, you shout back, “In the TV basket, coiled up.” They find it in seconds. Your partner needs the spare laptop charger before flying to Sydney for work—no drama, it’s in the desk kit. You head out to the backyard with a speaker and know exactly where the extension lead lives in the laundry, hanging neatly instead of knotting around the mop.
In a country where our homes juggle work, school, streaming, gaming, and endless devices—often under the same roof—it’s a quiet relief to remove one tiny source of daily friction. No more “Where’s the charger?” arguments layered over school runs or late-night report writing. No more yanking a knot of cables from a drawer and hoping for the best.
Storing cables isn’t about looking organised for the sake of it. It’s about creating a home that runs a little smoother, where the tools you depend on daily are treated with enough respect that they’re there for you when it counts. A small ritual, repeated: coil, place, retrieve. Over–under, in the right spot, ready for next time.
Most people store cables incorrectly because they’re thinking about getting them out of the way. Turn that around. Store them in a way that brings them into your life when you need them—intact, untangled, and exactly where you expect to find them.
Frequently Asked Questions
Is the over–under method really necessary for short cables?
For very short cables, like 20–30 cm phone leads, you don’t have to be as precise, but a loose version of over–under still helps prevent kinks. The longer the cable, the more useful the method becomes—especially for laptop chargers, HDMI cables, and extension leads.
What’s the best way to label cables without making them look messy?
Use small adhesive labels, or write directly on a short piece of masking tape wrapped near one end. Keep labels simple: device name or room name. You can also buy slim clip-on cable tags if you prefer a neater look.
How tight is too tight when coiling a cable?
If the coil is smaller than your hand span or feels like you’re forcing the cable to bend, it’s too tight. Aim for loose, relaxed loops about the size of a small dinner plate for most household cables.
What should I do with old or unknown cables I’m unsure about?
Place them in a separate “unsure” bag with today’s date. If you haven’t touched that bag in six months and nothing in your home has stopped working, it’s usually safe to recycle them through an e-waste program.
Are Velcro ties better than rubber bands for cable storage?
Yes. Velcro ties are softer, adjustable, and don’t dig into the cable’s insulation. Rubber bands can dry out, snap, or bite into the cable over time, increasing the chance of damage, especially in warmer parts of Australia.